
Life Insurance Awareness Month is a great time to be active on social media. But what if you have client meetings or a vacation scheduled and don’t have time to post? You can still take advantage of all the publicity and momentum if you plan your social media schedule ahead of time.
If you’re a casual social media user, you may not realize there are programs and browser extensions designed to help you pre-schedule your posts on the major social media networks. Some networks – such as Facebook – allow you to schedule your posts natively, without a third-party program. The right tools for the job will depend on your preferred networks, and how often you plan on pre-scheduling posts.
First, we'll go over two easy scheduling options for Facebook and Twitter. Toward the end of the article, we’ll go over two popular aggregators that let you post to most, if not all, of your social media networks. The aggregators have a slightly steeper learning curve, but if you want to amp up your social media presence, they’re well worth the time.
Social Scheduling on Facebook
Within the platform, Facebook allows you to schedule posts to your business page – not your personal profile. There are ways to schedule posts to your personal profile, but they’ll require the use of third-party software, which we’ll cover later in the post. Scheduling your page’s posts is super-easy. Just create the post as usual, including uploading any supporting photos or video. In our example below, we’re using a LifeHappens image featuring this year’s LIAM spokesperson, Danica Patrick.
Step 1: Click the down arrow to the right of "Publish." From the menu, select "Schedule."
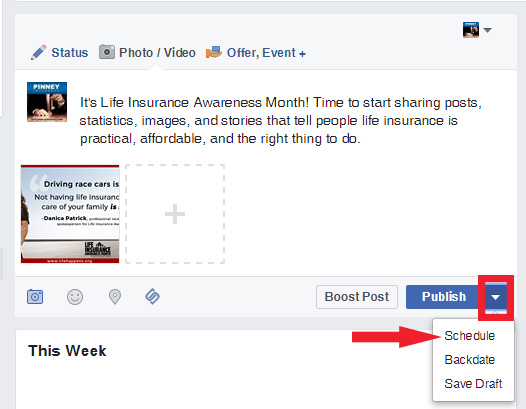
Step 2: Choose the date and time to publish, then click "Schedule."

Step 3: Make sure you see the scheduled post notification on your page’s timeline.
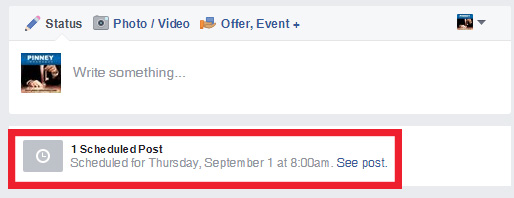
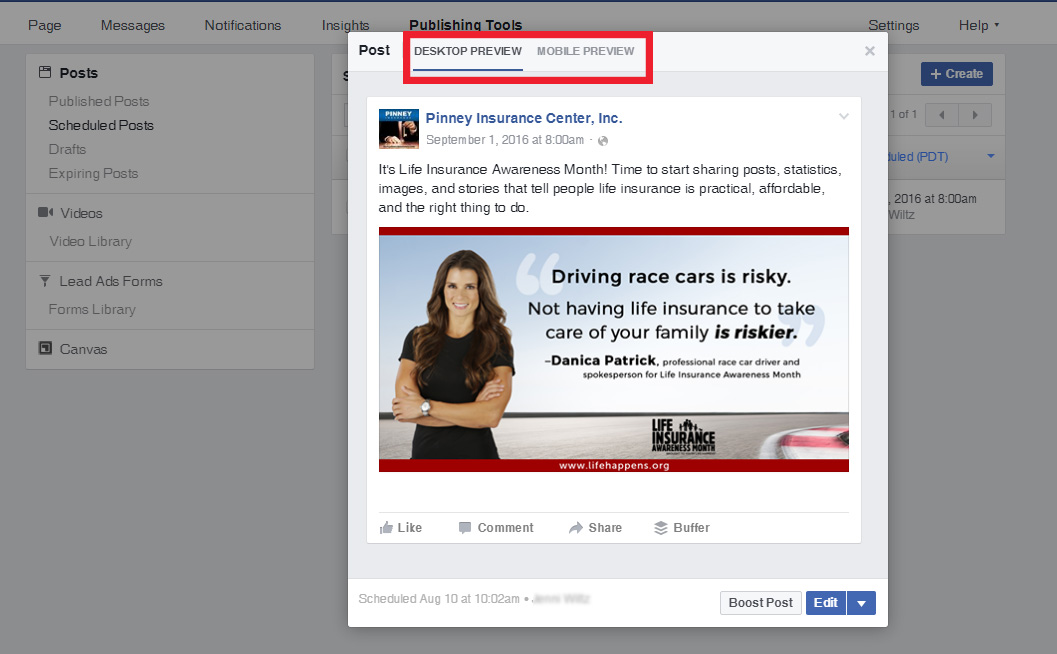
Step 4: Click “See post” to make sure everything saved properly.

Step 5: Click the blue post text to see an exact preview for desktop and mobile. If you like what you see, click the “x” in the top right of the post preview – you’re done! If not, click the "Edit" button to make changes.
Facebook will give you a notification when your scheduled post is published. Be sure to check in so you can respond to any comments or questions.
Social Scheduling on Twitter
There’s one extra step involved when you wan to pre-schedule your tweets. You’ll need to use TweetDeck, Twitter’s official tool for scheduling, as well as monitoring multiple accounts. The good news? You won’t need to create a separate login - just use your existing Twitter credentials.
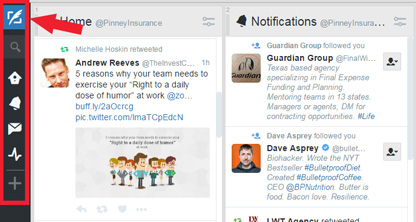
Once you log in, you’ll see a left-hand menu bar and four columns. Each column shows you a different part of your Twitter account – your home feed, notifications, messages, and recent activity among those you follow.
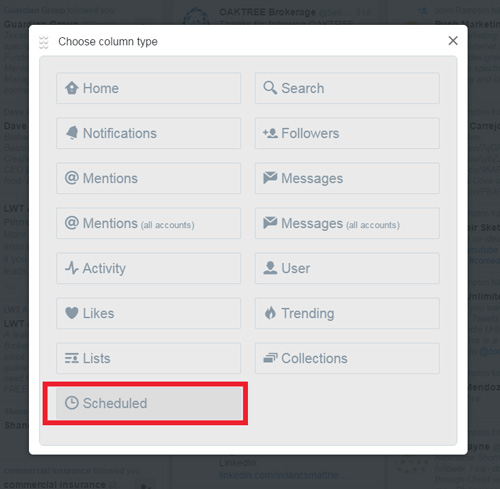
Step 1: Click the "+" in your left-hand column.
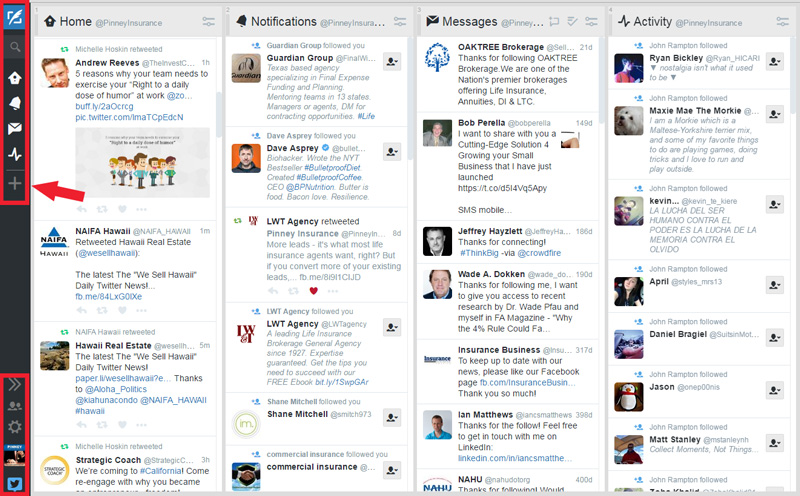
Step 2: Add a column for scheduled posts. You can add other columns if you like, but for the purpose of this post, we only need to see our scheduled posts.
Step 3: Hit the quill button to compose a new tweet.
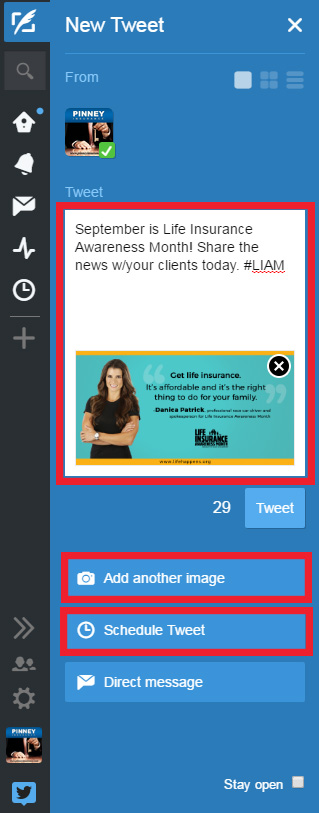
Step 4: Write your tweet, including any relevant hashtags (such as #lifeinsurance, #lifeinsuranceawareness, or #LIAM). Include an image if you want – in fact, it’s highly recommended. According to a Buffer study of tweets from verified users in the U.S., tweets with an image got 35% more retweets! When you’re finished, click "Schedule Tweet."
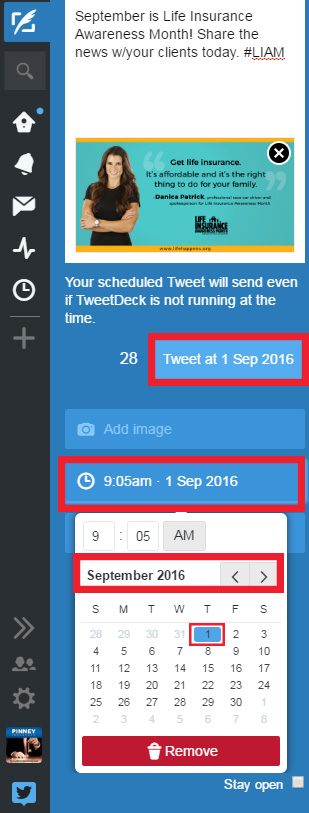
Step 5: Set the date and time for your tweet in the calendar. To save and schedule, click the blue button that says “Tweet” followed by the time you’ve selected. Don't worry - it won't post right now. As long as the date in the blue Tweet button is correct, go ahead and click.
Step 6: Look at your Scheduled column in the dashboard. You may need to hit refresh to see your saved tweet.
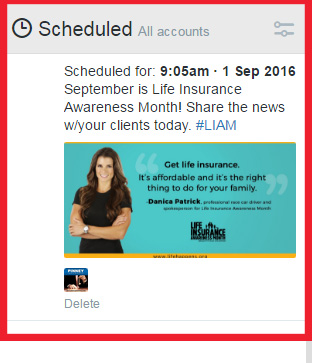
You can also use TweetDeck to monitor multiple Twitter accounts - very handy if you tweet for personal as well as business use.
Multi-Task with a Social Media Posting Tool
You may have noticed we’ve jumped into the aggregator section. That’s because LinkedIn and Google+ have no native scheduling capabilities. To pre-schedule your posts on these networks, you’ll have to use a third-party software solution.
One possible alternative? Pre-schedule your Facebook and Twitter posts, then dive into LinkedIn and/or Google+ natively. This reduces the time-suck of posting to multiple networks daily, but doesn’t require you to use an aggregator.
All-in-One: Social Scheduling with Buffer
Buffer allows you to post to Facebook, Twitter, LinkedIn, and Google+ pages. The platform will also help you create a social media schedule customized for your followers, designed to get the maximum amount of interaction for your posts. How do they do it?
Buffer's algorithm analyzes your past posts to determine when your followers are most likely to see and interact with your content. You also have the option to set a specific date and time for a post, if needed.
There are free and paid plans available, but if you don’t plan on stockpiling more than 10 posts per account at a time, the free plan will work. This plan allows you to post to one account per network (i.e., your Facebook profile OR your Facebook page, not both). The paid account allows you to add multiple accounts per network, as well as schedule pins on Pinterest.
The main idea behind Buffer is simple. It's designed to make it easy to create one post and share it multiple places. Just create your post, then click the avatars for the accounts you want to post to. If you keep your posts short (i.e., fewer than 140 characters for Twitter), it’s easy to post to multiple accounts at once. If you need more room, just create two posts – one for Twitter, and a second for longer-form networks like Facebook and LinkedIn.
Here’s what it looks like once you’re signed in and ready to connect your accounts:
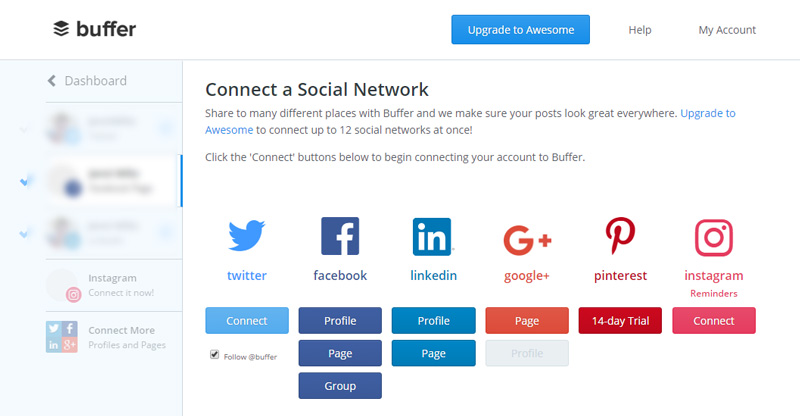
Just click the networks you want to connect, and follow the simple authorization process. Once your networks are connected, you’ll see them listed in the left-hand menu.
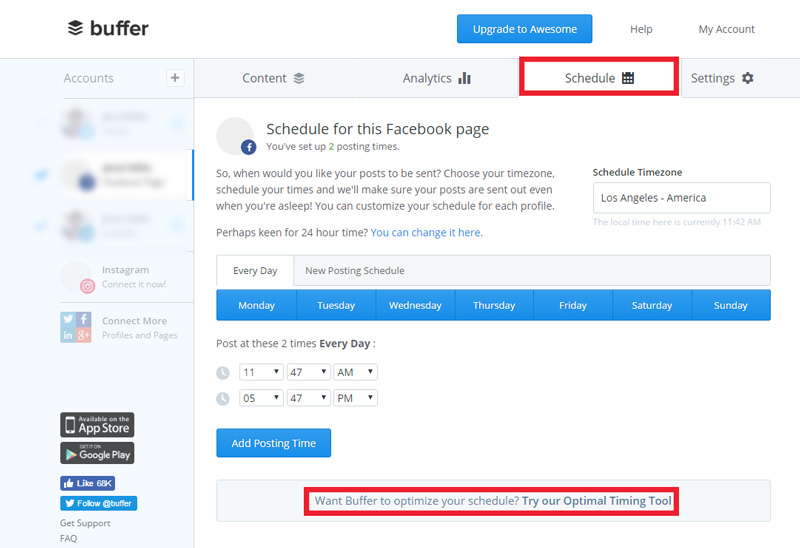
To get started, click the "Dashboard" link on your top-left. From your dashboard, just click "Schedule." Choose the number of times to post per day, and the times you’d like those posts to go out. You can set different posting times per network, too.
Not sure when to post? Click the link at the bottom of the scheduling screen and let Buffer tell you!
Their Optimal Timing Tool will analyze your social media followers by network, along with their last 5,000 interactions with you. Based on the time those interactions took place, Buffer will tell you the best times to post to that network. Even if you’re not using Buffer to schedule those posts, you can still click the link above and they’ll give you your optimal times to post. Pretty cool, right?
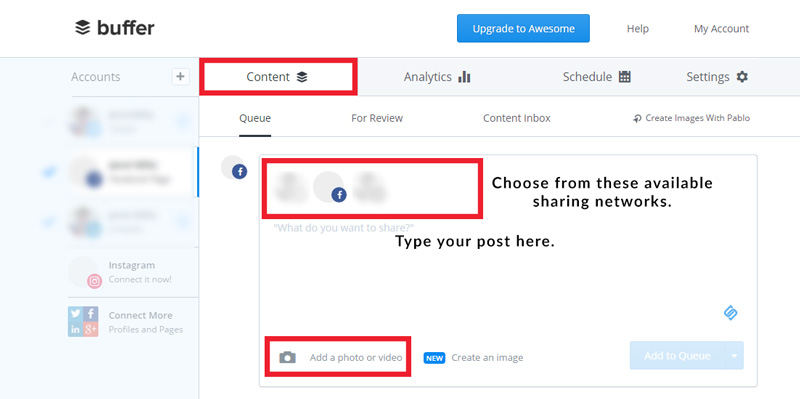
Once you’ve set a schedule, start filling your queue with posts. To create posts within Buffer, click "Content." Type your post and upload any photos or videos to go along with it. You’ll see your connected social media networks at the top of the post entry field. Click to select or de-select networks, then click the “Add to Queue” to save and schedule your post, as shown below:
There’s one more cool way you can fill your Buffer queue. Install the browser extension, and you have instant access to your queue anywhere on the web. When you find something you want to share, just hit the Buffer icon in your browser:

The Buffer extension will pre-populate the message field with a headline and a link to the page you're sharing. It will also give you the opportunity to type a quick message to accompany your Facebook post. Click to select or de-select social networks, customize the message, and hit “Add the Queue.”

Remember – Buffer is a scheduling tool. It’s not going to alert you to any comments or interactions on your posts. You’ll still need to check for those manually.
All-in-One: Social Scheduling with Hootsuite
Hootsuite is another option for creating your social media schedule. Like Buffer, you can choose a free or paid plan. The free account has a few limitations, but if you’re only looking to post to 3 or fewer accounts, it’s a good start.
One added bonus with Hootsuite is the ability to monitor interactions with your posts. You can instantly see the number of likes, shares, mentions, and more.
When you log in and connect your accounts, it will look a lot like TweetDeck, which we covered above. Your navigation options are lined up on your left. Your social feeds are displayed in columns, called "streams," and you can add, remove, or rearrange them as you like. Here’s what it looks like:
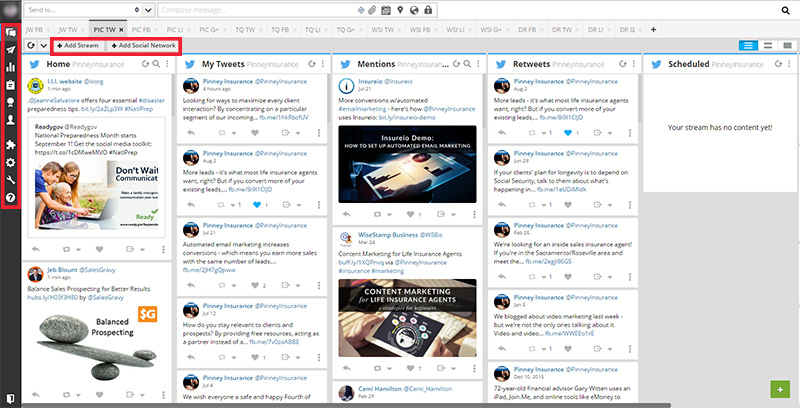
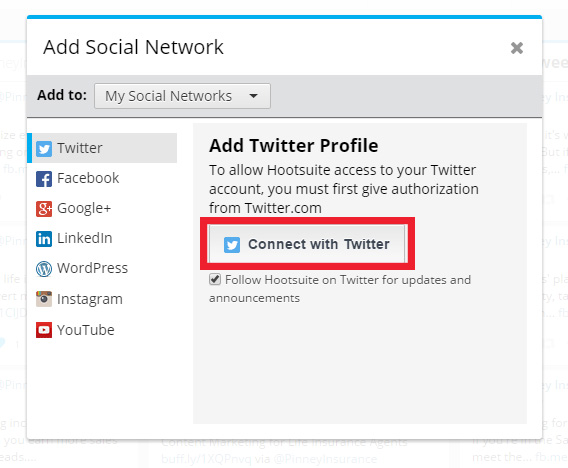
To get started, click the “Add Social Network” button, outlined in red above. You’ll get a pop-up dialog box showing your options. Connect each of the networks you want to post to here.
Once you’re connected, create a tab for each connected network. You can name the tab anything you like. (We have, like, a million tabs so we use abbreviations that indicate the account name followed by the network.)

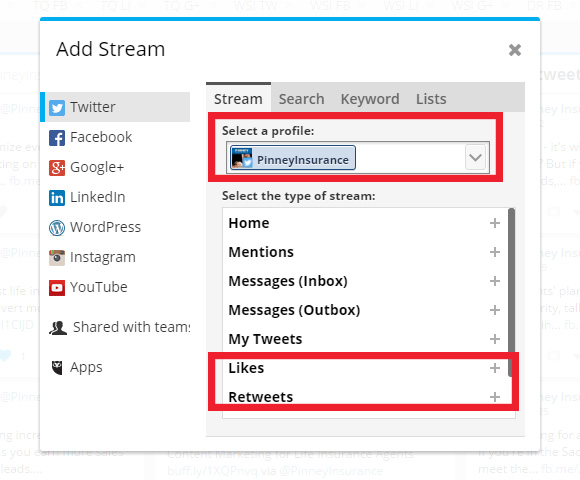
Next, fill each tab with the streams that are most helpful to you. When you select a profile, Hootsuite will show you all the available streams. The example below shows the options for our Twitter account. You can include mentions, likes, retweets, and more. Use the gray scroll bar to check out all your options – don’t forget to add “Scheduled,” which isn’t visible until you scroll.
Now that your dashboard is connected and populated, you’re ready to schedule your posts! No matter which network you want to post to, you’ll always start with the “Send to” box in the top left of your screen. Once you select the network to post to, type your message in the “Compose message” box. If that network has a character limit, like Twitter, you’ll see that noted in the message box. Check out the bottom-left of the message box below:

You can type an original message, or just paste the link of an interesting article. A link preview will pop up beneath the message composition window. Use the paperclip icon to attach a photo, and the calendar icon to schedule the post. Here's what the scheduling calendar looks like:
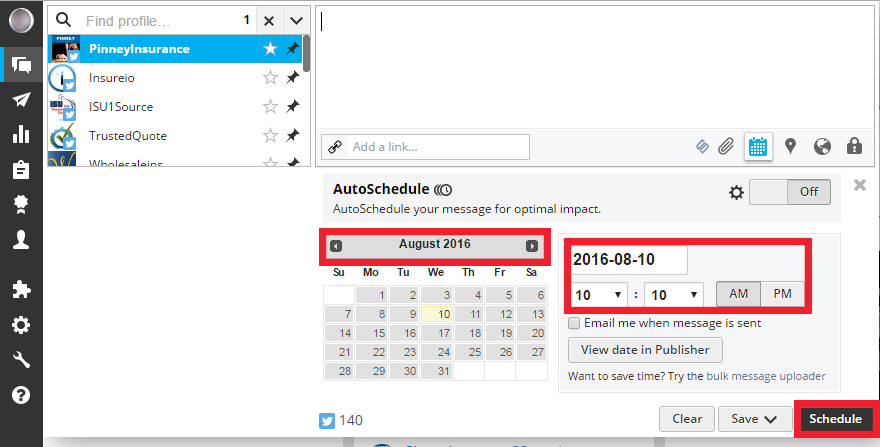
When you’ve selected a posting date, click “Schedule” and you’re done!
Create a Social Media Schedule for LIAM
Now that you know how to schedule and optimize your social media posts, you can work ahead to prepare posts for any major event or holiday.
Social media scheduling works well when you can devote several hours to it at a time—sit down, write your posts, paste your links, and get it done in a single day.
As with any pre-scheduled social media, you need to know when and where your posts are running. In the unlikely event of a tragedy, for example, it’s a best practice to log in quickly and pause, delete, or re-schedule any programmed posts that may not be appropriate.
It's also a good idea to supplement your scheduled posts with of-the-minute posts. Share your thoughts, emotions, and reactions to other things you’re seeing and doing during Life Insurance Awareness Month. Those heartfelt and impulsive posts bring variety and authenticity to your feed.
Let’s rock social media this September – without spending hours a day doing it!
What are your tips and experiences with social media scheduling? Chime in with a comment – we’d love to hear which platforms and programs are your favorites.
